
So your client or family member doesn’t have a fortune to spend but needs a professional video for their Amazon posted new product. Well if you have a pro SLR camera and some basic lighting equipment you can make a professional video for under $1,000 in costs.
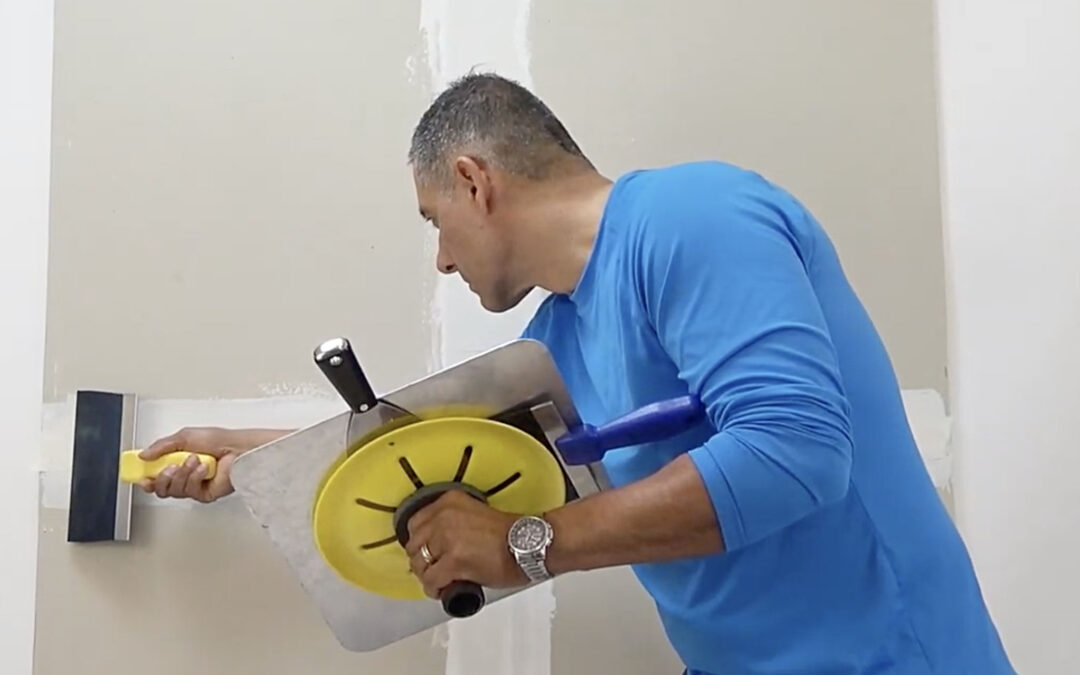
I recently had the challenge of making a one minute demonstration video for a new product called “Hawk Plate” a clever professional painters tool that holds multiple spackling knives at one time. My small business client certainly did not have a huge budget, and I love working for him so did not want to turn down his request. I have a small but very nice studio in my home and knew I could make it work.
I was able to purchase 9 foot wide white seamless paper and set it up on my two background tripod stands with a cross bar. Only a few hundred dollars to purchase these essential set up background paper tools or you might be able to rent them for the day from a camera shop. Any product photographer in New Jersey or product photographer in New York will tell you having a clean white or colored paper background is essential to making your product look good. You can not have background distractions of dry wall, a horizon line, molding or any other basement or apartment furniture or your video will look like amateur hour. So if you’re going to shoot products having a background paper tripod and pole kit is important and makes draping the paper on a roll fast and relatively easy. The cross bar of course supports your paper and all you need to do it pull the paper down to floor level to have a perfectly clean seamless background with no horizon line. Using a carpentry metal clamp inside the roll after you have determined the proper length you need will lock the roils of paper in place and stop it from over un-rolling causes buckles. The paper should be nice and taut with no buckles or wrinkles. In my case I had a 6 foot amateur model we paid to demo the product so I needed the paper to be at about 8 foot maximum height of my tripod stands. The tripods make it easy to load the paper low and raise the poll of paper high.
My client needed to bring a half sheet of dry wall and a piece of plywood we could first set up leaning slightly against my strong drafting desk, then we draped white seamless paper in front of the dry wall and finally screwed 2 pieces of sheetrock into the ply wood . My client then taped and applied his first cost of wet spackle into the seams to prepare it for the model.
My model was a good looking friend witch a great built and to add color to the video I chose a $16 bright blue fitted T shirt at Walmart. He looked great and I added so much color to the video with a bright blue $16 dollars shirt! I then set up only 2 inexpensive Impact light reflectors and stands with 2 -500 Watt LED bulbs. So the new mirrorless SLR cameras are so good that with only 1,000 watts of defused daylight bulbs he looked great and I could read the product very well. When I say defused I did use two white umbrellas to soften the light on the models face and illuminate the entire small set.
We needed a few warm up rehearsal takes to have my model get familiar with the action of pulling tools from the product called a “Hawk Plate” . I started recording with no microphone on as I knew we wanted to add music later . After several takes and we felt confident we had recorded at least a few good takes, we then did a second model rotation clip with the model to the product and a final close up and finally a clip of the tools the product can hold in place.
The final steps for my video editor was to choose some exciting, inexpensive stock music with an upbeat, uplifting, pop beat to make the video sound exciting but not too fast or loud. ( I use Audio Jungle for stock music)
Next was to provide a jpeg still frame of the company logo, product logo and package design of what the finished package looks like, and still frame of my product of the product in use. My video editor was able to use these still frames to first introduce the product, then cut to the live video to demo. He did use an advanced special effect software in Adobe Premier Pro to have the tools float into the frame and fall into place adding a nice creative effect. My client at first wanted the pace to be very fast but I felt it was important to art direct my model to proceed slowly to give potential customers a few seconds to absorb the visual of the product and the action of spackling and retuning the tools into the product holder. I also art directed my editor to leave the brand new name and logos up for 3 seconds to again give the customer time to adsorb the new names and finish the video with a great product shot the demos the product and the logo. It is an amateur mistake to move so quickly with a new product the video and new information appears as a blur.
My editor added a special effect rotating star burst to the still logo star burst I used on the package to give the video a little more sizzle.
So all costs for this shoot were under $1,000. Including 2 Light heads, 2- 500 watt LED Bulbs, 9 foot back drop paper, Model fee at $200. per hour, a bright blue T shirt and stock music. Photographers Fee and video editors fee with art direction time were additional. But it is very possible to create a first rate professional video for Amazon or Web pages on a tight budget. So if you’re looking for a New Jersey videographer for your product or need a product video in New Jersey or product videographer in New York at a reasonable cost, look no further than Ted DeCagna Photography, Cranford, New Jersey to meet your small business video budget needs.
Recent Comments